Wednesday, December 3, 2014

Activity and such

Ahem, I've not been a good blogger for a while (again) have I? Well, I figured I should update you all (if people are still even reading this blog haha) on what's been going on in my life, both cosplay wise and in my personal life. Actually, cosplay wise noting much has happened. I made a rushed Cubone (Pokémon) gijinka for Desucon in summer, but after that nothing much has happened. I would post some pictures of that cosplay if it weren't for the fact that they are on a external hard-drive about 400 km away now. Which sort of brings me onto what has happened in my personal life. 
     I moved away from Vaasa to Turku this fall to attend university (another reason not much cosplay have been happening), so yeah, there's that. BUT, I do have cosplay plans for the future, and the next con I'll be attending is Desucon Frostbite in February. Hansku and I are hosting a discussion circle on Saturday at 12:30, so everyone is super welcome to join us for that!
     Yeah, that pretty much sums up my short where-I've-been post, hopefully I'll have some more actual content for you sometime soon(ish) when I get back to working on costumes. Goodbye for now~


And some orphan baby bats. Completely relevant. And cute.


/Amanda

Tuesday, May 13, 2014

Sinon Photos!

Hello everyone! Cosvision came and went by quickly, and I'm super mega happy to announce that I got first place in the regular costume competition! I will write a con summary later on when I have some more time on my hands, but for now, have a couple of pictures of my latest and first award winning cosplay, Sinon from Gun Gale Online, or Sword Art Online Phantom Bullet Arc if you prefer that~


All photos taken by the awesome Hansku
Edit and cosplay by me

/Amanda

edit: It seems my editing looks waaay different when I put up the pics here, all except the last two ones.... I'll try figuring this out, but if anyone hav had a similar problem, please do tell

Wednesday, May 7, 2014

Cosvision plans!

Is there even a need for me to make this post? I mean judging by my previous posts I'm pretty sure you know what cosplay I'm debuting at Cosvision this weekend haha. But in case you really can't guess, spoiler alert, it's Sinon.

I'm entering the competition as well, so you should all totally root for me haha. No but in all seriousness, I have no idea what I've given myself into. I have no clue what level my competition is on or who else is competing, and since this is the first year ever of Cosvision, I can't use previous years for reference. But since it's a cosplay convention I'm guessing there will be some really badass costumes competing, it's going to be interesting to see what shows up. 
     Since I'm really busy with work and such I'll probably post the rest of my Sinon progress pictures after the con, and of course I'll write about the con itself as well. I'm as usual interested in who of you are going to Cosvision, and what your cosplay plans are, so if you want feel free to comment/link your blog/whatever :D. See you there!


/Amanda

Tuesday, April 29, 2014

Bloggity

I'm back. Again, oh boy. But I'll try to keep it short and simple this time around, even though I really don't possess the ability to do so. I finished my rifle for Sinon the other day, so naturally I'll focus mainly on that in this post. I might squeeze in some other stuff as well, I'll see about that. If there isn't any other stuff you'll get it eventually.


This was were I left off in my last post concerning the rifle, and while it was good on its way, it was far from finished. Many hours of sanding gesso had yet to be done. Seriously guys, if you don't like sanding gesso, don't pick this method of making any prop ever. Because if you want a nice even coat, you will have to do lots of sanding. Ironically I nowadays even work at a place that develops sandpaper, but that isn't relevant at all. You can probably already guess that I won't be keeping this short at all. Moving on, as you can see from the image above, what needed the most work was the stock. I had already covered it in paper mache, which I strongly dislike, and needed to make it smooth. Can you see where this is going?

Not much of interest happened, I covered it in a few layers of gesso, sanded, gesso, sanded, until I got it just like I wanted.


The first pic is a good example of how it looked like when it was not quite good yet, and the second pic shows you what I was trying to achieve. (Never mind the black spot on it, I accidentally got some paint on it, but no biggie.)
     Next up was the scope, and this was one of the parts that had me think the most. Eventually I ended up constructing it from softis, a PVC pipe, tape and toilet paper rolls. Very classy. You can probably guess what I covered it in as well.


Something that really had me think was the lenses in the scope. I had no idea what to make those out of, I wanted them to be a bit curved and over all cool looking. Out of the blue I asked my dad if he had any ideas to what I could make them out of, and at first he said that he had no clue. But a few days later he came to me with one of his most brilliant ideas ever. The balls that you get with washing machine detergent. They do have the right curve, and are easily cut into the size and shape I needed. This idea was so ridiculously awesome, I don't even.


Lenses~


I didn't put them in instantly though, I wanted to paint the rifle first. Here is how it looked like before paint;

And after the first coat;


Yeah you can totally see how it looks like, especially in the first pic /sarcasm/. After this first coat I decided to get things goinf with this rifle. Sinon uses her rifle all the time basically, so it wouldn't look brand new all shiny black at all. So I decided to add some wear and tear to it like so;


Yay, it looks like it has been used. The parts that are still white in this picture were painted respectively. The stock and handle will be painted to look like wood, and the magazine will be a silver metallic color, but lighter than the rest of the rifle. All of this was done in one sitting, so I only have pictures of the finished product left to show you. Take a moment to prepare yourself for the glory of my Sinon cosplay rifle, a replica of the Hecate II;


Hairspraybottle for scale haha. But yeah, there you have it. If you have more questions than this post could answer you are free to ask them and I'll try my best to answer. I'm now definitely too lazy to write anything else today, but I'll throw in a picture of me wearing the full cosplay (minus the scarf) so you can see how it is coming together;


Not 100% done yet, but it's definitely getting there. And it needs to be getting somewhere, i'm supposed to compete in this cosplay in less thank 2 weeks. Yikes. Anywho, I'll hopefully update again with some more stuff concerning this cosplay (does it ever end?) so until then, bye~


/Amanda

Wednesday, April 23, 2014

Wig review

Good day everyone! I decided to make a post that differs from my usual ones, I'll try my hands at making a wig review~ I don't know about you, but at least I like to read different kinds of reviews, and I figured it'd be nice to make one myself for once, so here we go;

I ordered my wig from the cosplay.com wig store (link) and just from hearing that some of you might already go "Oh no..." (or fuck yes, what do I know) and it is true that this company has a bit of a bad history and a bad reputation. However, I ordered from them since I really like their selection of colors, and they were the only ones who had a wig in the light blue shade I wanted. 
     I'll start off with how fast I received my wig. Or more correctly, how fast I didn't receive it. It took a whopping 3 weeks before they even shipped my order, a total of 15 business days. On their site it says "By default, wigs ship in 5-10 business days, unless otherwise noted". I call bullshit on that since it took way longer. I emailed them asking what was taking so long, and I did get a nice reply explaining that it was on its way from the manufacturer to them so they could ship it.Which to me sounds like the wig I ordered was out of stock, although I couldn't see this anywhere on their site. It shouldn't take 3 weeks to get an order shipped in my opinion, unless you warn the customer beforehand.
     Moving onto the actual shipping. It was silly expensive, 14 dollars, but again, I had no choice if I wanted that wig. It didn't actually take that lmany business days to get the wig, but since easter happened it took almost 3 weeks, however, only 11 business days. That does feel like an okay shipping time.
     The packaging was sort of only semi good. The wig was wrapped in a net like usual, but the bag it was in wasn't a ziplock bag or anything reusable, it was a really wrinkly plastic bag. And all that was inside of a USPS package of course. If it wasn't for me usually using the bags my wigs are shipped in for storage as well I wouldn't have any complaints, but since I do, a reusable bag would have been nice.
     And finally the most important part, the actual wig. It was just like pictured style wise, and I had expecting nothing less since they do use only thier own pictures. One thing I noticed though is that on their site they state that the inside caps are the same color as the wig, instead of black and beige like other wig companies usually have. Well guess what, in my light blue wig the cap was surely beige. However,this doesn't bother me personally, but since they actually advertise their caps being the same color as the fibers, it'd be nice to apply that to reality as well. Something else they advertise, and definately deliver, is a blend of different colored fibers in the wig to make it look less solid and more realistic. I love it when wigs have that feature, and therefore I love the blend of the wig I got as well. I can distinguish at least 3 different colors in there, and they work well together creating a nice shade of blue. The overall thickness of the wig and the quality of it are definately above your usual eBay wig. I'd place their quality right next to the quality of the wigs from matchwigs.com (link). And I do like matchwigs a lot. Another plus in my case was the sizing. The wig fit me nicely, it wasn't as small as some chinese eBay wigs I have, but not as big as my Epiccosplay wig. In other words, a perfect fit. But I do have a small head, so you people with really big heads should maybe look for your wigs elsewhere.

TL;DR version:

Handling time: 1/5
Customer service: 4/5
Shipping cost: 2/5 (I've seen worse)
Shipping time: 4/5
Packaging: 3/5
Style: 5/5 (definitely like the pictures)
Color: 5/5
Overall quality: 4,5/5

So in short I guess I could say make sure you have time to wait for your wig if you order from this site, but if you do, the wig you'll receive is probably worth it!
     I'll finish off with some pictures of my new baby;


On my head in bathroom lighting, no flash and no makeup haha


Window lighting, no flash
 (it was a bad dark kind of window lighting though)


Close up of the top and the blended colors, no flash


Fabulous, but mandatory, indoor light, flash picture

That'll be it for this post, I'll be back shortly with more progress post. This is no empty lie, I do love flashing this cosplay all over the internet if I get the chance, so you'll get more of it, I won't have it any other way. Bye for now~


/Amanda

Thursday, April 10, 2014

Posting craze! About rifles and scarfs this time~

I don't think I have ever been as active of a blogger as I am at the moment. But I'm super excited about Sinon and this entire project so you'll just have to deal with it haha. But I shall try not to ramble very much as I usually do in my posts, so I'll stop beating around the bush and show you what masterpieces I have created this time around.
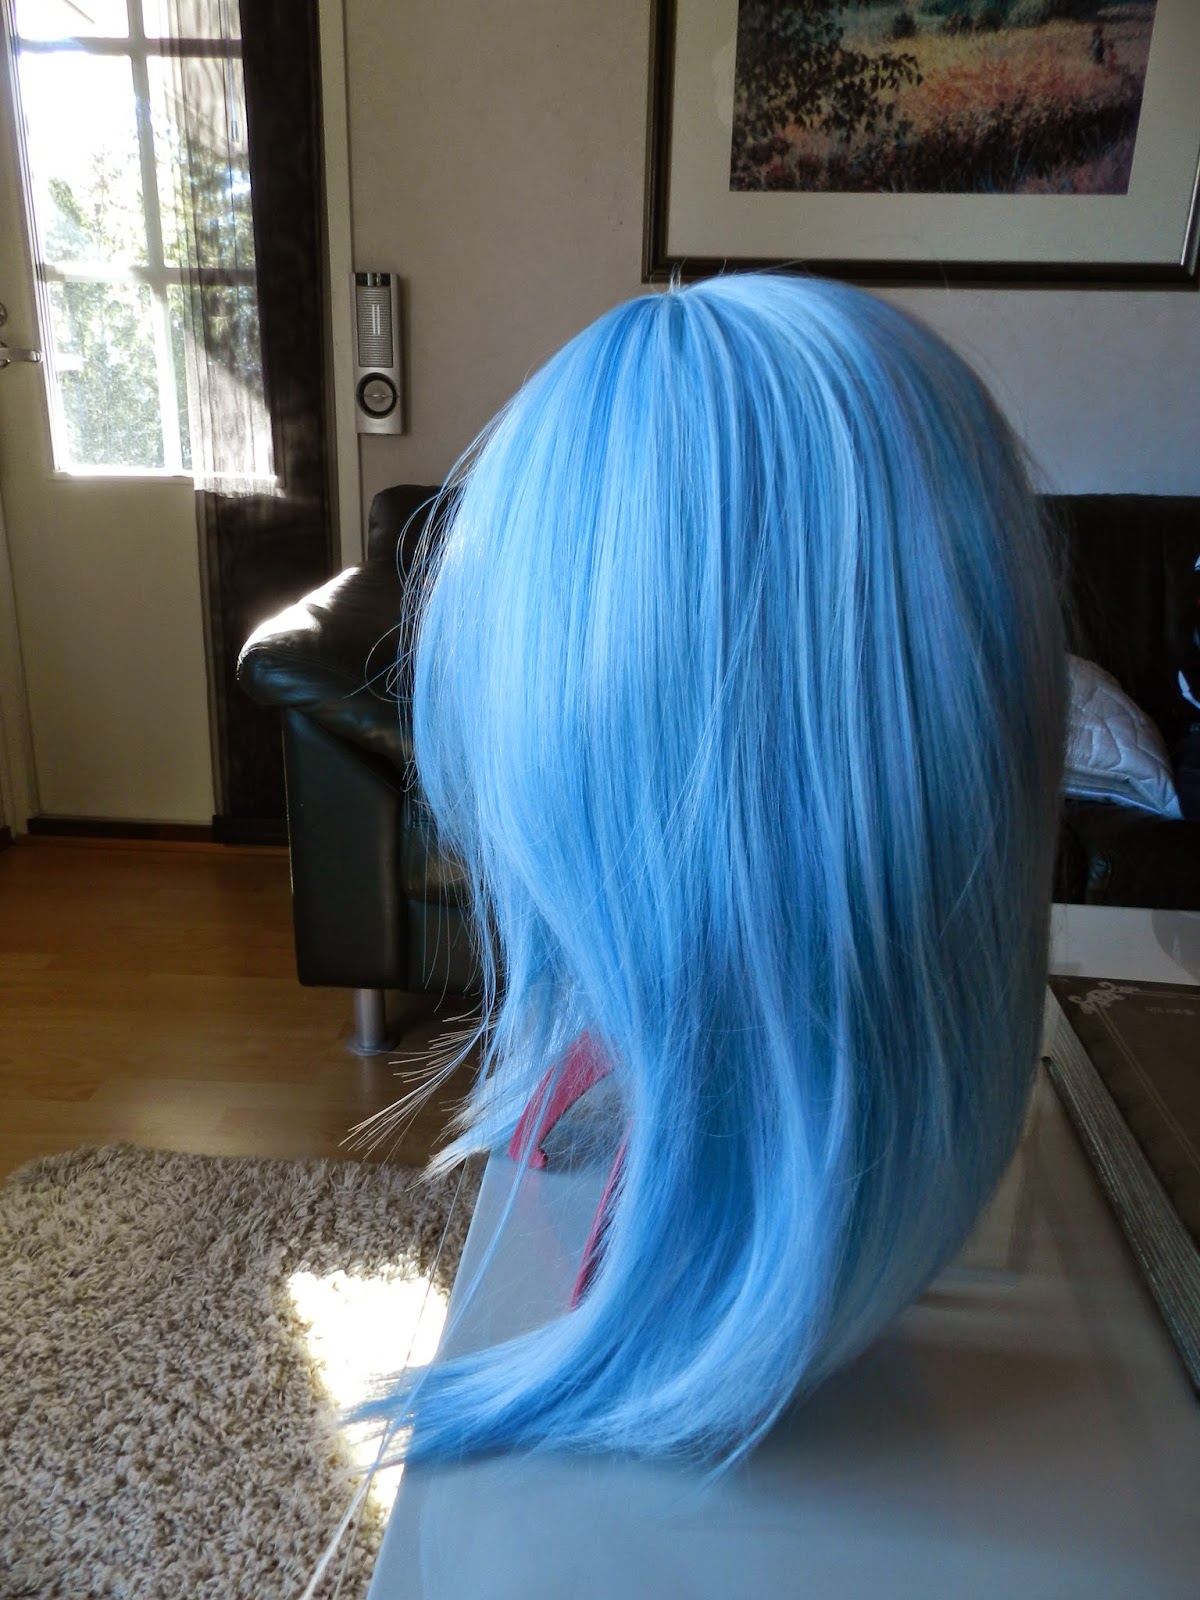
     Kicking off with a fancy scarf that I made yesterday in a couple of hours. The design is really simple, and I chose to make the scarf like a tube sort of thing for more thickness, since Sinons scarf does look very big. I chose fleece for the material because hey, it's a scarf, so that works, and because it gives an accurate look to the overall piece. 


The whole thing measures 2,5 meters, which is a pretty damn long scarf. I made applique for the first time ever as well for the symbol on there, and it turned out pretty damn good if I may say so myself. It was a bit tricky since the symbol is fairly small, but it worked out since I did it nice and slow.

     And now for, at least according to me, more exciting stuff! The monster and most important piece of this cosplay, her rifle. I have never made something like this before, so it's really all trial and error. But I like it, I definately enjoy making it more than I thought I would. Which is great since it takes forever to make. I've used cardboard as my main material, with a side of camping mat and craft foam. That cocktail of materials may seem a bit so-so for something that is supposed to look like metal, but I find that with enough patience, gesso and sandpaper, most things can become really nice and smooth. I have yet to finish the rifle, so I'll make a part 2 about its making later on. But I really do feel like I want to share what I've made so far right now, and I welcome all feedback, both positive and negative, so that I can fix anything that doesn't look quite right, and maybe polish something that looks awesome even futher. So please, if you have time, it'd be nice if you left some feedback so I can make this prop look awesome :3.
     I've decided making it completely non-functional, the barrel doesn't move or anything, because I want to mainly focus on the aesthetics of it. 


I started out with printing a life-size reference picture for myself, just so I'll get the scale of the parts done right. I also made it the same size as the real life rifle model Sinons rifle is based on (PGM Hecate II). So everything is correct and to scale. As you can see I started with a simple base and started building onto it.


As you could see from my previous post I had already pretty much finished the handle and magazine part asides from paint and the trigger, and in the top picture you can see how it looks paired up with the other part. And as illustrated in the picture below, everything was endlessly covered in gesso and sanded and repeat.


Further detail was added as you can see in the pictures. I added the end piece on the barrel and those things where the barrel connects to the body of the gun. I have no idea what function those fill, but hey, they look cool. In the lower left picture you can see the scope coming together, but it's still far from done.


I then started working on the stock. The inside is cardboard, and then I glued on layers of camping mat that I shaped into the right shape with a hobby knife. Then I had to do something I just really don't like, paper maché. It just never works for me, but there was no way around it, I had to do it. And thus my stock is currently looking like a newspaper blob with a toilet paper roll on it. Absolutely beautiful. But that will of course change, I just have to wait for the god damn paper maché to dry. That's totally not why I'm writing this post, to waste time until it dries. 


And finally, a shot of the rifle in the state it is in right now. I just attached the barrel handle whatever and added some detail. I'm soon going to get the whole magazine and handle and all that on there, so that should be really exciting. Hopefully it all sticks together and doesn't fall apart.

UPDATE/EDIT:


     I figured it'd be cool to put the parts next to each other. Except for the scope which is still covered in wet gesso. Also the stock is going to be closer to everything else, but because wet gesso I couldn't put it in its proper spot so now it's derping there next to the rifle.

     That's all I've got for now, I hope you enjoyed and maybe even learned something. I'm realizing I've definately underestimated cardboard as a material, it's quite cool to work with really. But yeah, bye for now, I will post a part 2 about this rifle project later on, so stay tuned~


/Amanda